This tutorial will guide you through installing, setting up and using Gnome Do (v0.4.2.0) in Ubuntu Linux. From the Ubuntu Wiki on Gnome Do:
GNOME Do is an intelligent launcher tool that makes performing common tasks on your computer simple and efficient. Do not only allows you to search for items in your desktop environment (e.g. applications, contacts, bookmarks, files, music), it also allows you to specify actions to perform on search results (e.g. run, open, email, chat, play).
Though the installation steps are specific to Linux, the setup and usage is the same for all versions of Linux that Gnome Do supports.
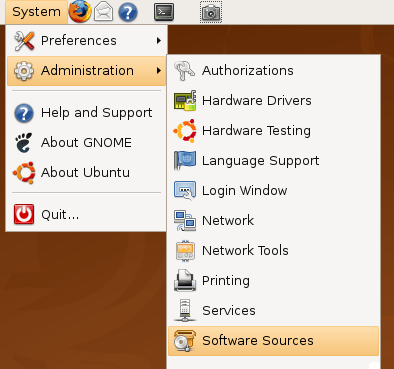
- First up, you’ll need to add a new source to your Software Sources. To do so, select System -> Administration and then Software Sources. Enter your password when prompted.
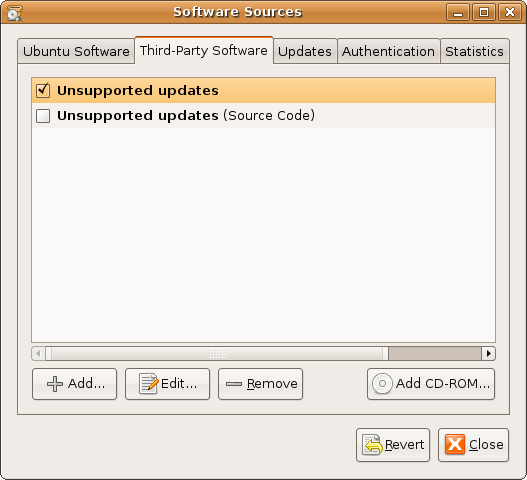
- Select the Third-Party Software tab and click the +Add button.
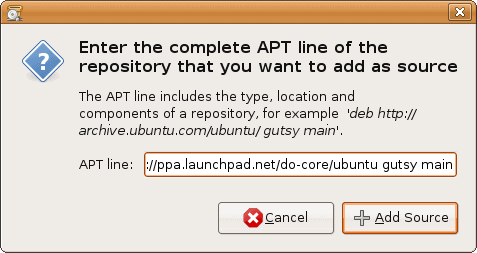
- In the APT line: section, enter:
deb http://ppa.launchpad.net/ipod-touch/ubuntu gutsy main
and then click the +Add Source button. NOTE: this tutorial assumes you’re using Gutsy Gibbon (7.10). If you’re using Hardy Heron (8.04) you’ll want to enter the line:
deb http://ppa.launchpad.net/ipod-touch/ubuntu hardy main
However, the resulting version of Gnome Do will be newer, and the “usage” section of this tutorial will be slightly different for you (particularly the plugin section).
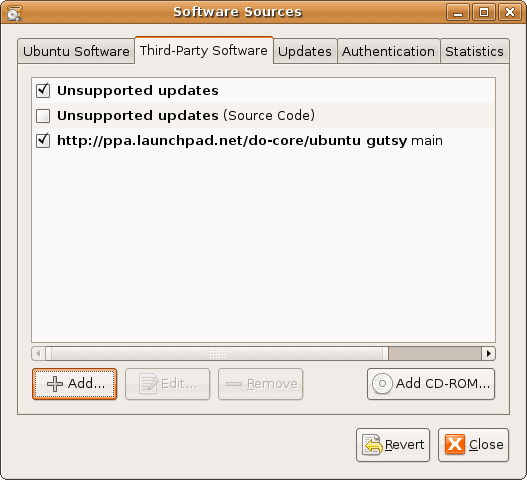
- Back on the Third-Party Software tab, click the Close button.
- You’ll be notified that information about some of the available software is out of date. Click the Reload button.
- Once the software sources have been updated, the window will close. Now open the Synaptic Package Manager by selecting System -> Administration -> Synaptic Package Manger.
Click the Search button from the top of the Synaptic toolbar. Enter Gnome Do in the space provided and click the Search button.

- Once you’ve located Gnome Do, place a check in the box next to it. You’ll be presented with a small pop-up window - from that window select Mark for Installation.
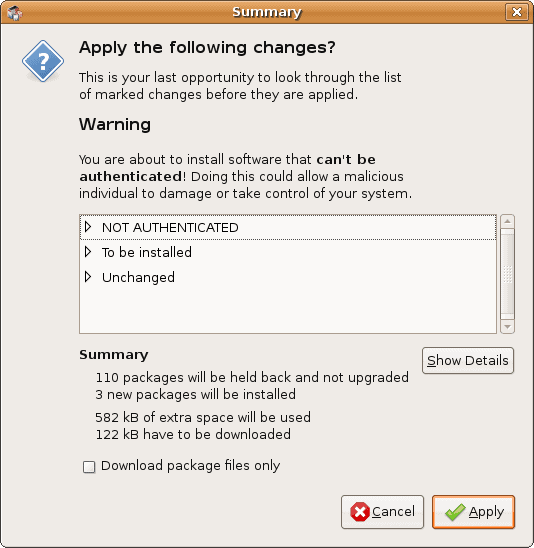
- If you’re warned that the software can’t be authenticated, just click Mark anyway.
- Click the Apply button.
- Now you’ll be presented with a summary screen. This lets you know what’s going to be installed, what’s not going to be upgraded (if you have pending updates) etc. Click Apply to begin the download and installation.
- Let Synaptic do its thing…
- .. and after a couple of minutes Gnome Do will have installed. Click Close to finish.
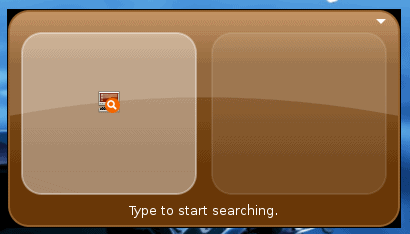
- To launch Gnome Do, select Applications -> Accessories -> GNOME Do.
- If it doesn’t pop up on your screen right away, hold down the Windows Key (also known in Ubuntu as the “Super” key) and hit the Space bar. That’s the default keystroke combination to bring up Gnome Do.
- Start typing the name of a file, folder or application. In the example below I started to type Documents but only got as far as Doc before Gnome Do recognized what I was going for. Hitting the enter key at this point would open up my Documents folder - because the action in the right pane is Open.
- As you type (again my example will be Documents) Gnome Do creates a “list” of things you might mean. Use the down arrow key to see all of the files, folders, bookmarks and programs that contain “doc” in them. You can use the down key and then enter to select an item.
- Once you have an item selected, use the Tab key to move over to the “action” section. As previously mentioned, the default action is “Open”. Again, use the down arrow key to view and/or select alternate actions - like Open Terminal Here, Copy to…, Move to… or Move to Trash.
- If you click the small arrow in the upper-right corner of Gnome Do you’ll be presented with 3 options. About, Open Plugins Folder and Quit. Select Open Plugins Folder.
- This is where you can put plugins for Gnome Do to use. Note: if you’re using v0.5 of Gnome Do you don’t need to drop plugins in this folder to install them, you can install straight though the Gnome Do preferences panel.
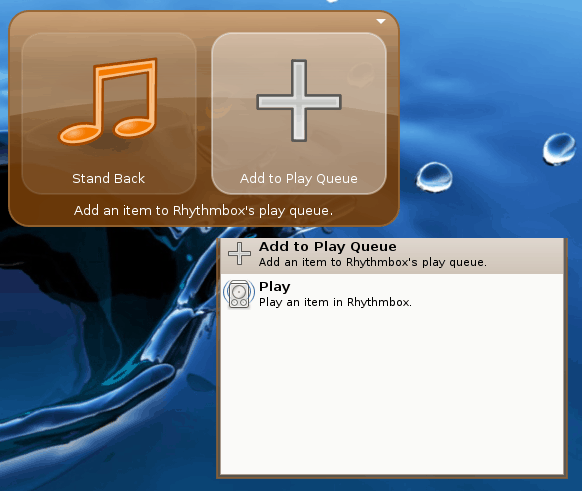
- One helpful plugin is the Rhythmbox plugin. It allows you to play, locate, add-to-queue etc.
- Ex. Once a song is selected in Gnome Do (and the Rhythmbox plugin is installed) the actions include Add to Play Queue and Play.
- Continue exploring the various features of Gnome Do - you’ll find it’s very handy. And coming soon, I’ll have a similar tutorial but for Gnome Do v0.5 (the latest release).


0 comments for this post